Espresso Puck Screens (2026 Buying Guide): Better Flow, Cleaner Group Head, and Less Channeling

Espresso puck screens sit between the portafilter basket and shower screen

Espresso Puck Screens (2026 Buying Guide): Better Flow, Cleaner Group Head, and Less Channeling

A puck screen is a thin stainless disc that sits on top of your tamped coffee, between the basket and the shower screen, and its job is simple: spread incoming water evenly before it ever touches the puck. That one change tightens shot-to-shot consistency, which is why it has become a common add-on in home setups built around measured, repeatable brewing rather than guesswork.

Key Takeaways (Quick Answers First)

What it does A portafilter puck screen sits between the basket and the shower screen to spread water more evenly through the puck.
Why it helps The mechanism is physical, not magical: it reduces micro-channeling and can improve shot-to-shot consistency when distribution is imperfect.
What doesn’t matter much If your pucks are fresh and already well distributed, a puck screen tends to add less, because the variable it fixes is already under control.
Buying rule Match the screen diameter to the basket diameter, not the portafilter outer diameter. Common families are 58mm puck screen, 54mm, and 51mm.
Dial-in pairing Use it after your WDT step: WDT to fix distribution, then tamp, then puck screen, then brew.
  • Typical pore sizes on stainless puck screens run roughly 100 to 200 microns — fine enough to spread flow evenly without choking it.
  • Grinder and grind consistency come first. A puck screen is a refinement on top of a dialed-in grind, not a substitute for one.

For context on dial-in mechanics, start with our grind size micron reference chart — a puck screen can reduce sensitivity to distribution, but it can’t fix an incorrect grind size.

Espresso puck screens sit between the portafilter basket and shower screen

What Espresso Puck Screens Actually Do (and Where They Sit)

Let’s remove the fluff. Espresso puck screens are thin discs you place between the portafilter basket and the shower screen. If your machine uses a normal bottomless or spouted portafilter basket, you load coffee, level and tamp as usual, then set the screen on top of the puck surface.

The mechanism is simple: the screen acts like a distribution layer. It forces incoming water to spread across a larger area before it hits the coffee, so water flow is less likely to “find a path” through tiny weak spots in the puck.

The physical job: reduce uneven flow paths

  • Micro-channeling usually starts where distribution is slightly uneven, or where fines and clumps create small high-permeability paths.
  • A puck screen provides a more uniform entry geometry, so the effective resistance across the puck surface becomes more consistent.
  • Many stainless screens use pore openings in that same 100–200 micron range, which helps control flow without acting like a strainer that stalls every shot.

Where it matters most

  • If you sometimes see spurting, early gushes, or big blonding swings between shots, a puck screen can reduce that variability by smoothing the water input.
  • If you’re dialing in and suspect distribution — not grind — is the limiting variable, a puck screen can make your workflow less sensitive to “almost right” prep.

Why Puck Screens Help (Even When You’re Not “Messy”)

Here’s the part people argue about, so let’s ground it in mechanism. A puck screen’s benefit usually comes from pressure distribution and flow uniformity, not from adding extra filtration in the “stop particles” sense.

1) More even water distribution inside the puck

Even if your puck looks smooth, the coffee bed can have small density gradients. When pressurized water arrives from the shower screen, it can preferentially wet lower-resistance micro-paths. A puck screen increases the chance those paths start from a more level distribution surface.

2) Cleaner group head in real use

This is less about “better taste” and more about what happens at the shower screen face. When flow is more uniform, you typically see less aggressive, channel-driven blasting. That often means fewer stubborn fines deposits on the group head over time — cleanup becomes a maintenance task instead of a troubleshooting task.

3) Less channeling during the most chaotic part of extraction

The earliest phase of a shot is where small preparation differences show up as big output differences. By adding a distribution layer, a puck screen can reduce the odds that a single weak channel dominates early flow.

Coffeelyrics logo

Did You Know?

Tightening puck distribution is one of the practical levers for landing inside the 18–22% extraction range described in the Specialty Coffee Association’s commonly cited golden-cup standard.

When Puck Screens Don’t Matter Much

This is important. There are times when a puck screen is basically a “nice to have.” If you’re already distributing correctly, the screen can’t manufacture randomness out of thin air.

They matter less when distribution is already excellent

  • Very fresh, well-distributed pucks reduce the chance of persistent weak channels.
  • If your WDT pattern is consistent and your tamp is level, the puck is already close to uniform resistance.
  • If your grind is correct and stable, flow is already consistent, so the screen’s effect is smaller.

“Fresh” isn’t a buzzword — it’s a physical variable

When grounds sit exposed to air and moisture swings, you can get clumping or subtle changes in how fines behave. Keep dose and puck conditions stable and your results tend to stay stable too, which means the screen has less to fix.

If you want a dial-in mindset for your espresso workflow, pair the puck screen with our digital scale guide — measured inputs are what let you notice whether the screen is actually helping, or whether grind was the limiting factor all along.

Home espresso setup with grinder, portafilter, and digital scale

Size Compatibility: 58mm, 54mm, and 51mm (Buying Rule That Actually Works)

Most puck screen mistakes are size mistakes. People buy a screen that fits the portafilter body and then wonder why it doesn’t sit cleanly on the basket.

Use this concrete buying rule

Match the screen diameter to the basket diameter, not the portafilter diameter.

Why? The screen rests on the coffee bed, supported by the basket geometry. The portafilter’s outer diameter is irrelevant once the basket and gasket interface are already fixed.

Common size families in practice

  • 58mm puck screen is the common target for many 58mm portafilters and baskets.
  • 54mm sizes show up on some classic European configurations.
  • 51mm is common on certain smaller portafilters, including entry-level machines.

Tip: if you’re unsure, remove the basket and measure the inside diameter where the screen must land, then buy the closest matching size for your basket.

Best Puck Screen Options in 2026 (Budget to Premium)

We’ll compare real current options by design tier. Exact compatibility depends on diameter, so we’re going to phrase these by the sizes they’re typically sold for, and keep you focused on what to check before checkout.

Budget tier: generic mesh disc

Budget puck screens commonly come as food-grade stainless mesh discs with pore openings sized for consistent flow, and they’re usually cheap enough to treat as a workflow test.

  • Typical price range: roughly $10–$20 for an entry-level 304 stainless puck screen.
  • Best for: dialing in, where you want less sensitivity to distribution quirks.
  • Compatibility check: confirm the screen diameter fits your basket in your 58mm, 54mm, or 51mm setup.

Mid tier: Normcore puck screen

The Normcore puck screen line is popular because it tends to hold a consistent fit and a practical thickness, so you can focus on your dial-in rather than fighting a disc that sits crooked.

  • What to look for: a flat, even rim that sits without rocking on the basket lip.
  • Thickness range awareness: consumer screens are typically thin, often in the 1.5–2mm range, which helps rigidity without adding much height inside the basket.
  • Best for: anyone who already uses WDT and wants one more stability layer in the same routine.

Normcore WDT distribution tool used to break up clumps before placing a puck screen

Premium tier: IMS-style stainless puck screens

Premium screens are mostly about machining quality — consistent thickness and controlled perforation or mesh geometry. The goal is to remove the accessory itself as a source of variability, so your real variables stay grind, dose, yield, and time.

  • Best for: people who dial in weekly and want long-term repeatability.
  • Compatibility check: confirm the exact diameter for your basket — many premium lines still come in the common 58mm, 54mm, and 51mm sizes.
  • Expect: smoother seating and more consistent flow behavior as you adjust grind.

If you already use a WDT tool as part of your prep, a puck screen is a natural extension of the same goal: more uniform resistance across the bed.

How to Use a Puck Screen in a Dial-In Workflow

Dial-in is where a puck screen earns its keep, because it helps separate “process” issues from “grind” issues. Here’s the workflow we recommend for clean input/output tracking.

Step-by-step (one shot setup)

  1. Weigh your dose into the basket, then settle it gently — no tapping chaos.
  2. WDT pass: use your WDT tool to break clumps and redistribute fines. Aim for a consistent number of stirs, not “until it looks good.”
  3. Tamp level — one commit, no re-tamps.
  4. Place the puck screen flat on top of the puck.
  5. Brew and measure yield with a digital scale, track time, and adjust only one variable at a time.

If you’re troubleshooting inconsistent results, also check our water chemistry guide — water input changes extraction too, and a puck screen doesn’t neutralize incorrect water.

What changes after you add the screen

  • You may see steadier flow and slightly different timing to hit your target yield.
  • Your grind setting might need less correction than before, because the screen reduces sensitivity to small distribution errors.
  • If flow runs slower than expected, confirm diameter, seating flatness, and pore geometry — a mismatch usually shows up as under-extraction.

The same logic shows up in our piece on turbo shots vs. slow extraction: controlling your variables matters more than chasing any single accessory. A screen can stabilize early flow, but it won’t replace correct grind and a measured ratio.

Tamper, distributor, and portafilter with fresh espresso grounds on a home barista counter

Cleaning, Storage, and Common Mistakes

Cleaning is where most people accidentally undo the benefits. A partially clogged screen creates its own flow restriction and confuses your dial-in.

How to clean it

  • Rinse immediately after use to prevent oils from baking onto the stainless surface.
  • Once or twice a week, soak in warm water — with a gentle coffee-safe cleaner if needed — then rinse thoroughly.
  • Dry it fully so you avoid mineral buildup that can alter effective flow resistance.

3 common mistakes to avoid

  • Wrong diameter: a screen that’s too small won’t distribute evenly, and puck edges can still channel.
  • Rocking on the basket: if the rim isn’t seated flat, water will find gaps.
  • Skipping your prep: don’t treat a puck screen as a substitute for WDT. It helps, but it isn’t a full workflow replacement.

Our Final Recommendation

If you want the best puck screen for 2026, don’t start with the fanciest option. Start with compatibility and workflow fit.

  • On a budget and just testing whether a puck screen improves your process? Start with an entry-level stainless mesh disc, typically priced around $10–$20.
  • Already WDT and tamp consistently? A Normcore puck screen is the practical mid-tier choice, because consistent seating matters for predictable flow.
  • Brewing daily and chasing long-term repeatability? An IMS-style premium screen can be worth it, since it removes one more variable from your system.

Whichever tier you pick, follow the buying rule: match the screen diameter to your basket, not your portafilter. Pair it with WDT in your dial-in workflow, track grind and yield changes with a scale, and let the screen do the one job it’s actually good at — reducing micro-variation, not compensating for everything else.

Frequently Asked Questions (Espresso Puck Screens)

Do espresso puck screens really improve extraction?

Yes, and the mechanism is physical distribution. Spreading water evenly across the puck reduces micro-channeling, which is a major driver of shot-to-shot inconsistency — it’s a big part of why the accessory has become a standard part of many home dial-in routines.

What is the best puck screen size for a 58mm portafilter?

For a 58mm system, people often buy a 58mm puck screen, but the safer rule is to match the screen diameter to the basket. Portafilter outer diameter can mislead you, so measure the basket surface where the screen will sit.

Does a Normcore puck screen work with 54mm and 51mm setups?

Often, yes — many models are sold in multiple diameter options, including smaller families like 51mm. Before buying, confirm the exact screen diameter for your basket, since the portafilter puck screen needs to sit flat and fully cover the coffee surface.

Should I use a puck screen with WDT, or is WDT enough by itself?

In a dial-in workflow, treat WDT as the distribution fix and the screen as the distribution layer for incoming water. Use WDT first, tamp, then place the puck screen, so the two improvements stack instead of competing.

Is a puck screen worth it if my shots already taste good?

Maybe — the gains are often smaller when your pucks are fresh and distribution is already consistent. Puck screens tend to help most when there are small uneven resistance zones, because that’s where micro-channeling starts.

How do I clean a puck screen so it doesn’t clog?

Rinse right after brewing to prevent oil buildup, then soak periodically and rinse thoroughly. If you notice slower flow or under-extraction, check that the screen is dry, free of deposits, and correctly sized for the basket.

What pore size should I look for in a stainless puck screen?

Many stainless screens target pore openings in the 100 to 200 micron range, which helps spread water without choking flow. If a screen feels too restrictive for your machine and dose, check diameter and seating before assuming the pore size is the problem.


Best Gooseneck Kettle for Pour-Over Coffee (2026): Precision Spouts, Stable Temps, and Real Pour Control

Realistic home pour-over coffee brewing setup featuring a dripper, glass carafe, gooseneck kettle, coffee grinder, digital scale, and fresh coffee, representing the best pour-over coffee makers under $100.

Best Gooseneck Kettle for Pour-Over Coffee (2026): Precision Spouts, Stable Temps, and Real Pour Control

The best gooseneck kettle for pour-over coffee comes down to one thing: flow control. A restricted spout is typically designed to cap flow somewhere in the 15–40 ml/sec range — narrow enough that you can slow to a thin, steady stream during bloom instead of flooding the bed. Most straight-spout kettles pour far faster than that, which is why they’re hard to use for anything beyond filling a mug.

Key Takeaways

What matters most Spout diameter and shape, because they directly change flow-rate precision and reduce channeling.
Temperature stability PID or variable-temp electric kettles help you stay on target, since the slurry cools during transfer and brewing.
Handle ergonomics Slow spiral pours require wrist comfort, and a poorly balanced handle makes accuracy drift.
Capacity vs footprint Smaller bases fit a tight coffee station, while larger capacities can be awkward on cluttered setups.
Flow restrictors Look for spout designs that naturally cap flow, so your pour becomes an input you can control, not a guessing game.
Related reading Pair your kettle choice with our V60 vs Chemex vs Kalita Wave dripper comparison and our pour-over coffee maker roundup.

Why pour control gets you specialty coffee results, not just “better vibes”

Beginners often start with a basic kettle, then wonder why their pour-over tastes inconsistent cup to cup. Most of that inconsistency comes from how the water actually moves inside the dripper — not from the ritual around it.

With a true gooseneck, two physical design choices matter most for pour control: the spout diameter/shape and the way the neck guides the stream into the coffee bed. Together they influence flow-rate precision, your ability to repeat a bloom, and how evenly you can run a controlled spiral through the grounds. The Specialty Coffee Association’s brewing research treats even water distribution as core to extraction, not a garnish on top of it.

  • Spout diameter and shape change how easily you can “feather” the pour when your target is low flow.
  • Flow restriction helps prevent channeling, because the stream is less likely to carve a single path through the bed.
  • Handle balance controls wrist fatigue, which directly affects how steady your pour feels after a few slow spirals.
  • Electric heat hold (if you go that route) helps maintain temperature targets during the time between heating, pouring, and extraction.

Your kettle is the “output driver” for water delivery. If that output is unstable, your extraction becomes a guessing game — and no amount of dial-in fixes that.

What to look for in a gooseneck kettle for pour-over coffee (spouts, temps, capacity)

If we had to boil it down, we’d ask one question: does this kettle make the next pour repeatable? In 2026, the best gooseneck kettle for pour-over coffee is usually the one that lets you stay consistent across three variables — flow, temperature, and ergonomics.

1) Spout diameter and shape, where pour control actually starts

A gooseneck spout isn’t just a “look.” It changes the stream dynamics, and stream dynamics are what let you slow down during bloom, then speed up slightly during the main drawdown without overshooting.

  • Narrower openings generally make low-flow control easier.
  • Longer necks help aim the stream so you can work a steady spiral without splashing.
  • Stream stability matters, because micro-drips create minor bed agitation differences that can shift extraction.

2) Temperature hold stability (PID vs variable-temp electric vs stovetop)

Even if you nail your brew ratio and use the same coffee grinders, temperature can drift where it matters. Water commonly loses several degrees between the kettle and the coffee slurry — often somewhere in the 5–15°C range depending on pour speed, cup material, and room temperature — so “near boiling” isn’t the same as hitting your actual brewing target.

  • PID-controlled electric kettles hold tighter temperature ranges for stable extraction.
  • Variable-temp electric kettles are good, but check how long they maintain the set point.
  • Stovetop kettles are simple and reliable, but they require timing discipline.

3) Capacity vs counter footprint (your coffee station layout)

Capacity matters if you brew multiple cups back to back, but counter footprint matters if your setup is a tight home coffee corner. The Fellow Stagg EKG’s base, for example, is roughly six inches across — compact enough to fit a prosumer workflow without turning your counter into a cluttered control panel.

4) Handle balance and wrist fatigue during slow pours

Slow pour-over technique demands stable wrist angles. If the handle is poorly balanced, you’ll compensate mid-pour, and your spiral becomes uneven — especially during the 2-3 pours most recipes use for bloom and continuation.

5) Flow restrictor designs worth knowing about

Some kettles effectively “teach” you slower pours. The effect can come from spout geometry alone, from valve behavior in electric models, or from how the neck guides the stream so flow naturally caps when you tilt less.

That’s why restricted-flow gooseneck designs are worth the small price premium for pour-over, especially if you’re stepping up from a basic drip setup with consistent specialty coffee goals.


Best gooseneck kettle for pour-over coffee setup with dripper, glass carafe, coffee grinder, and digital scale

A gooseneck kettle is part of the workflow, not an accessory you ignore.

Best gooseneck kettle under $100 (budget, stovetop focus)

Budget kettles can still give you real control in 2026, as long as the spout design supports low-flow pouring. Buy a kettle that makes slow pours easy, then let your grinder and scale do the fine-tuning.

Hario V60 Buono Stovetop Kettle (Gooseneck), around $40–55

If you want a first gooseneck kettle without turning this into a big purchase, the Hario V60 Buono is one of the cleanest entry points. The spout is shaped for controlled streams, which helps you practice bloom agitation and controlled spiral pours without fighting a fast, wide flow.

  • Best for: home barista gear setups that already follow a consistent brewing routine.
  • Strength: affordable gooseneck precision, simple workflow, easy to recommend.
  • Watch-outs: you must manage temperature timing on the stove.

Budget reference price: $40–55.

Best mid-range electric gooseneck kettles (stable temp, smoother repeats)

Once you’re consistently brewing specialty coffee, heat stability becomes the next bottleneck. If you’re doing daily pour-over sessions, an electric kettle that holds temperature helps you keep extraction targets consistent, especially when you pour immediately after reaching set temp.

OXO Brew Adjustable Temperature Electric Kettle (Gooseneck), about $100

This is the workhorse option we point people to when they want an electric kettle without jumping straight to premium PID. With an adjustable temperature setting, you can stay close to your recipe target, and the gooseneck style supports slower pours for bloom and controlled drawdowns.

  • Best for: prosumer stepping up from basic drip, still building a consistent routine.
  • Strength: electric convenience, repeatable heat control for pour-over.
  • Watch-outs: heat hold time is shorter than premium models, so you need an efficient pour workflow.

Mid-range reference price: $100.

Logo

Did You Know?

Most pour-over recipes target a 1:15 to 1:17 coffee-to-water ratio — a kettle with inconsistent flow makes that ratio much harder to actually hit, even when your scale reads the right number.

Premium variable-temp gooseneck kettles (best for consistency and heat hold)

At the premium end, you’re not just paying for more features. You’re paying for stability: tighter temperature control and the kind of predictable flow behavior that makes slow pours feel like muscle memory.

Fellow Stagg EKG Pro (Variable Temperature Electric), about $195

If your goal is a top-tier gooseneck kettle with consistent heat hold, the Fellow Stagg EKG Pro is a strong pick. Premium models also use PID-style control, which helps stabilize kettle temperature close to your setpoint for repeatable extraction.

  • Best for: daily pour-over sessions where you care about consistent temperature and flow feel.
  • Strength: variable-temp stability, practical gooseneck aiming, solid counter presence.
  • Watch-outs: you still need a consistent pour technique — kettle control alone won’t fix uneven agitation.

Premium reference price: $195.

Did You Know?

A common target for PID-controlled kettles is holding within about ±1°F of the set point — tight enough that your brew temperature stays predictable cup after cup.

How kettle choice connects to real pour-over technique (bloom, spiral pours, extraction)

Here’s the connection most people miss: kettle design affects what you can do during bloom agitation and controlled spiral pours, and those steps drive extraction outcomes.

Bloom agitation: use controlled flow, not force

During bloom, you’re trying to evenly wet grounds and release trapped CO2, not flood the bed. A restricted gooseneck flow makes it easier to maintain a low, steady stream while you build volume gradually.

  • Slow flow helps the bed expand evenly, reducing uneven wetting.
  • Stable aiming lets you bloom across the whole surface rather than drilling a channel.

Controlled spiral pours: keep your wrist repeatable

The spiral technique is basically a repeatable input pattern. If your kettle’s spout is hard to feather, your spiral becomes a series of inconsistent jets, which changes bed agitation and extraction rate.

  • Balance in the handle helps you keep the same arc and height across pours.
  • Stream stability helps you land water consistently without splashing and channeling.

Match kettle stability to your brew workflow

Hold times vary a lot by design. Some premium electric kettles keep water close to your set point for up to an hour, while more basic electric models can drift off target within 20–30 minutes. If your routine is unhurried, that gap barely matters. If you’re pouring for guests back-to-back, it’s the difference between a consistent bloom and a lukewarm one.

If you want a dripper-focused refresher, pair this kettle guide with our pour-over dripper comparison, because dripper design changes how water distributes, which changes how your kettle stream “reads” in the bed.

Gooseneck kettles for travel and portable espresso setups

Not everyone wants a full home coffee corner. If you do coffee travel, you may be thinking about portable espresso, or you might just want a reliable pour-over workflow at a hotel, camper, or office kitchen.

  • Stovetop gooseneck kettles are often easier to pack than electric models.
  • Electric kettles can be convenient at home, but travel means power access and careful heat management.
  • Ergonomics matters even more when your setup is cramped and you’re brewing with limited workspace.

If your travel goal leans more toward portable espresso, our portable espresso maker guide covers compact options worth pairing with a travel-friendly stovetop kettle for the mornings you fall back on pour-over.

Best for different users: our quick picks (budget to premium)

Don’t buy everything at once. Pick the kettle that fixes your current bottleneck — flow control, temperature stability, or ergonomics.

  • Best for budget stovetop: Hario V60 Buono Stovetop Kettle (gooseneck), around $40–55
  • Best mid-range electric: OXO Brew Adjustable Temperature Electric Kettle, around $100
  • Best premium variable-temp: Fellow Stagg EKG Pro, about $195

Once you pick, lock in the rest of your input chain. Use your coffee scale for gram-level accuracy, keep your coffee grinder consistent, and follow a fixed ratio so the kettle can do its job.

Conclusion

The best gooseneck kettle for pour-over coffee is the one that gives you repeatable control: a spout that supports low, precise flow, and heat stability that matches your workflow. Whether you start with a budget stovetop like the Hario V60 Buono or move to a premium PID-style variable-temp electric kettle like the Fellow Stagg EKG Pro, your pour becomes an input you can trust — which is exactly how you get consistent specialty coffee extraction.

Frequently Asked Questions

What makes a gooseneck kettle better for pour-over coffee than a regular kettle?

A gooseneck kettle improves pour-over control because the spout diameter and shape limit and direct the flow more precisely. That helps you manage bloom agitation and controlled spiral pours without channeling, which directly affects extraction quality in pour-over coffee.

Is an electric gooseneck kettle worth it in 2026 for specialty coffee brewing?

In 2026, an electric gooseneck kettle is worth it when you want temperature hold stability that supports repeatable extraction. PID or variable-temp electric models can be especially helpful if you brew daily and need consistent temperature during the time between heating and pouring.

How slow should a gooseneck kettle pour for best results?

Many restricted-flow gooseneck kettles target low flow behavior, roughly 15–40 ml/sec, which makes it easier to feather the pour during bloom and main pours. The goal is controlled volume delivery, not speed, so you can keep the coffee bed evenly wetted.

Does kettle temperature accuracy matter if I already use a good coffee grinder and scale?

Yes. Even with a great grinder and an accurate scale, the temperature drop from kettle to slurry can be significant, often in the 5–15°C range. Stable kettle temperatures help you stay on target so extraction doesn’t drift.

Which gooseneck kettle is best for a small home coffee corner?

Look for a compact base and comfortable handle balance, since counter space and wrist ergonomics both affect your workflow. Premium kettles like the Fellow line are popular in home setups because the base footprint is relatively compact, roughly six inches across.

Can I use a gooseneck kettle for coffee travel if I also do portable espresso?

Yes, but plan around power. For coffee travel, stovetop gooseneck kettles are often easier because they don’t require electricity, while electric gooseneck models can work if you have reliable power access at your destination.

What should I pair my gooseneck kettle with for the best pour-over technique?

Pair it with a fixed brewing ratio, a burr coffee grinder you can repeat day to day, and a digital scale for gram-level accuracy. Then focus on controlled bloom agitation and spiral pours, because that’s where kettle design changes the extraction in the cup.


The Complete Guide to Tamper Mats: Types, Materials & How to Choose the Best for Your Home Coffee Corner

Whether you’re pulling your first espresso shot or dialing in your daily morning routine, a tamper mat is one of the most overlooked yet essential accessories for any home barista. This unassuming piece of silicone or rubber protects your countertops, stabilizes your portafilter, and helps you achieve consistent, level tamps—critical for extracting the perfect shot. Understanding the importance of Tamper Mats can enhance your coffee experience.

Using quality Coffee Tamper Mats not only enhances your tamping technique but also safeguards your workspace. Investing in the right Coffee Tamper Mats will truly elevate your coffee experience at home.

Choosing the best Coffee Tamper Mats is essential to ensuring stability and protection for your equipment. With the right Coffee Tamper Mats, you’ll notice a significant improvement in your espresso shots.

Properly using Coffee Tamper Mats can reduce mess and improve your brewing routine.

In this guide, we’ll explore every type of tamper mat available, the materials that matter, and how to select the perfect one for your specific home coffee setup. By learning about Tamper Mats, you’ll be better equipped to make informed decisions about your coffee setup.

When selecting Coffee Tamper Mats, consider the material and design for optimal performance. High-quality Coffee Tamper Mats can provide the durability and grip needed for consistent tamping.

Investing in the right Coffee Tamper Mats helps maintain your equipment in the long run.

What Is a Tamper Mat and Why Do You Need One?

A tamper mat is a protective pad designed to hold your portafilter steady while tamping espresso grounds. It serves three primary functions:

Let’s dive deeper into the types of Coffee Tamper Mats and their unique benefits.

Portafilter Coffee Tamper Mats ensure your brewing tools are always protected.

Consistency — Provides a stable base for applying even pressure, reducing channeling, and improving extraction

Countertop Protection — Prevents scratches and dents from metal portafilter spouts and tamper bases.

Stability — Non-slip surface keeps the portafilter from sliding during tamping

Professional baristas wouldn’t dream of tamping without one—and neither should you.

Infographic showing different types of coffee tamper mats including portafilter mats, corner mats, bench mats, flat tamping mats, and built-in tamping stations with their uses and benefits for espresso preparation.
A complete guide to coffee tamper mats—explore types, benefits, materials, and pro tips to improve your espresso workflow and protect your countertop.

Using Coffee Tamper Mats can enhance your coffee-making skills, especially for beginners.

Espresso was born in 1884. The tamper mat? It simply appeared when counters started cracking..

Types of Tamper Mats: Find Your Perfect Fit

1. Portafilter Mats

These Coffee Tamper Mats are a necessity for serious coffee enthusiasts.

FeatureSpecification
DesignThick, cushioned flat surface
Best ForResting portafilter between grinding, dosing, and tamping
Key BenefitProtects portafilter spouts and basket from damage
Ideal UserResting the portafilter between grinding, dosing, and tamping

Portafilter mats focus on protecting your investment. These thick, cushioned pads cradle your portafilter when not in use, preventing the spouts from contacting hard countertops. They’re typically flat with a slightly recessed area to keep the portafilter stable

Flat Coffee Tamper Mats are perfect for those who prefer a minimalist setup.

Top Pick: Rhino Coffee Gear Portafilter Mat — durable silicone that protects both counter and equipment.

When setting up your espresso station, make sure to choose the right Coffee Tamper Mats.

2. Corner Tamper Mats (Edge Tamping Mats)

FeatureSpecification
DesignLearning the proper 90° tamping technique
Best ForEdge support allows pushing the portafilter against counter for stability
Key BenefitEdge support allows pushing the portafilter against the counter for stability
Ideal UserRight-angle edge fitting flush against the counter edge

Corner tamper mats are the secret weapon for consistent tamping. By fitting snugly against your counter edge, they allow you to push the portafilter against a vertical surface—ensuring a level 90-degree tamp every time. This design is especially valuable for beginners who haven’t yet developed the muscle memory for straight tamping.

Top Pick: Watchget Espresso Tamping Mat — compact, durable silicone that doesn’t hold odors

3. Bench Tamper Mats

FeatureSpecification
DesignLarge-scale surface covering significant counter area
Best ForDedicated coffee stations and home bars
Key BenefitMulti-zone workspace for grinding, dosing, tamping, and tool storage
Ideal UserSerious home baristas with dedicated space

Bench tamper mats transform your entire countertop into a professional coffee workstation. These extended surfaces often incorporate zones for different tasks—grinding, WDT distribution, tamping, and even knock box integration. They’re ideal if you have a permanent coffee corner.

Make sure to clean your Coffee Tamper Mats regularly for hygiene and longevity.

Top Pick: Large silicone bench mats (60cm+) or custom coffee station solutions.

4. Flat Tamping Mats

FeatureSpecification
DesignSimple, flat silicone or rubber sheet
Best ForBasic protection and bottomless portafilter users
Key BenefitUniversal compatibility, easy storage
Ideal UserMinimalists and those with limited space

5. Built-in Tamping Stations

FeatureSpecification
DesignIntegrated platform with dedicated tamper and tool holders
Best ForOrganized, permanent setups
Key BenefitEverything in its place—tamper, distributor, WDT tool
Ideal UserThose who value workflow efficiency

These all-in-one solutions go beyond simple mats, incorporating slots and holders for your entire puck prep toolkit. While they take up more space, they create a café-quality workflow in your home

.

Top Pick: Motta Tamping Station or custom wooden stations for aesthetic appeal.

Materials Matter: What Your Tamper Mat Should Be Made Of

The material of your tamper mat affects durability, grip, cleaning ease, and even odor retention. Here’s what professional baristas recommend

MaterialProsConsBest For
Food-Grade SiliconeNon-slip, heat-resistant, dishwasher-safe, odor-resistantCan attract dustMost home baristas
RubberHeavier, extremely durableHarder to clean, may retain odorsHigh-volume use
TPE (Thermoplastic Elastomer)Eco-friendly, recyclableLess common, variable qualityEnvironmentally conscious users
Leather/PU LeatherPremium aesthetic, develops patinaRequires maintenance, expensiveDesign-focused setups

Our Recommendation: Food-grade silicone offers the best balance of durability, hygiene, and ease of cleaning for 95% of home baristas

How to Choose the Best Tamper Mat for Your Needs

Step 1: Assess Your Portafilter Type

Portafilter TypeRecommended Mat Type
SpoutedCorner mat with notch or flat mat
Bottomless (Naked)Flat mat or corner mat without notch
BothFlat mat for versatility

Step 2: Evaluate Your Counter Space

Space AvailableIdeal Mat Size
Compact kitchenSmall corner mat (4-6 inches)
Moderate spaceMedium flat or corner mat (8-10 inches)
Dedicated coffee barLarge bench mat (12+ inches)

Step 3: Consider Your Skill Level

Experience LevelFeature Priority
BeginnerCorner edge for leveling support
IntermediateNotch for spouted portafilters
AdvancedMaterial quality and aesthetic preference

Step 4: Factor in Maintenance

If you value easy cleaning, prioritize:

  • Dishwasher-safe silicone
  • Smooth surfaces without deep grooves
  • Dark colors that hide coffee stains

Top Tamper Mat Recommendations by Category

Best Overall: Watchget Espresso Tamping Mat

  • Compact corner design
  • Durable, odor-resistant silicone
  • Excellent value at ~$18

Best for Beginners: Rhino Classic Portafilter Tamp Mat

  • Corner edge for level tamping
  • Thick, protective silicone
  • Trusted by professionals

Best for Small Spaces: Homeffect Compact Mat

  • Minimal footprint
  • Can sit on espresso machine drip tray
  • Easy to store

Best Premium Option: La Marzocco Home Tamping Mat

  • Sleek, reduced-size corner wrap design
  • Quality silicone thickness
  • Professional brand aesthetic

Best Budget Pick: Generic Silicone Flat Mat

  • Under $10
  • Universal compatibility
  • Easy to replace

Tamper Mat Care and Maintenance

Proper maintenance extends your mat’s lifespan and ensures hygiene

  1. Daily: Rinse with warm water after use
  2. Weekly: Deep clean with mild detergent
  3. Monthly: Check for wear, especially on knock bars (if integrated)
  4. Storage: Ensure completely dry before storing to prevent mold

Pro Tip: Most silicone mats are dishwasher-safe—check manufacturer instructions

Frequently Asked Questions

Q: Can I use a tamper mat with any espresso machine? A: Yes—tamper mats are universal accessories that work with all portafilter sizes and machine brands.

Q: How often should I replace my tamper mat? A: Quality silicone mats last 3-5 years with daily use. Replace when you notice cracking, permanent staining, or loss of grip.

Q: Are expensive tamper mats worth it? A: For most home baristas, mid-range silicone mats ($15-25) offer the best value. Premium leather or branded options are aesthetic choices rather than functional upgrades

.

Q: Can I make my own tamper mat? A: While possible, commercial mats are engineered for specific coffee oils and heat resistance. DIY solutions often degrade quickly or retain odors.

Final Thoughts: Elevate Your Espresso Routine

A tamper mat is a small investment that pays dividends in countertop protection, tamping consistency, and overall espresso quality. Whether you choose a simple flat mat for your compact kitchen or a full bench mat for your dedicated coffee bar, the key is matching the mat type to your specific workflow and equipment.

Setting up your station? Check out our guides to budget espresso machines, premium double boiler machines, and our roundup of essential barista tools.

Ready to upgrade your setup? Explore our detailed reviews of the best corner tamper mats, top portafilter mats, and premium bench mats to find your perfect match.

Frequently asked questions about Coffee Tamper Mats can guide new users to make informed choices. Understanding the benefits of using Coffee Tamper Mats is essential for any home barista. When considering replacements, think about the performance of your previous Coffee Tamper Mats.

Quality Coffee Tamper Mats can have a lasting impact on your espresso-making journey. There’s much to explore when it comes to different styles of Coffee Tamper Mats. Ultimately, investing in good Coffee Tamper Mats will enhance your brewing experience.

4 Amazing Barista Tools to Elevate Your Home Espresso Setup

Essential barista tools for home including coffee tamper, espresso distributor, portafilter with fresh grounds, and thermometer on wooden countertop

Having the right barista tools can truly transform your home espresso experience. The right accessories don’t just make brewing easier — they ensure consistency and quality in every cup.

Why Accessories Matter for Home Baristas

Have you ever wondered why your espresso shots taste different every time, even when using the same beans? The answer is often puck preparation. The way you distribute, tamp, and prepare your coffee grounds before pulling a shot is critical. Inconsistent pressure or an uneven coffee bed can lead to channeling, where water finds the path of least resistance and bypasses most of the grounds. This results in a sour, under-extracted shot.

The right barista tools solve this problem. They are designed to create a repeatable workflow that ensures your coffee puck is perfectly prepped every single time. By improving your consistency, you unlock better flavor and a more satisfying espresso experience.

Coffee Tamper

🏆 Top Pick:  Normcore V4 Coffee Tamper

After looking at countless tools on the market, one item consistently stands out for its blend of performance, price, and popularity among home baristas: the Normcore V4 Coffee Tamper. This isn’t just another accessory; it’s arguably the best espresso tamper for a home barista looking for an immediate upgrade.

For consistent results, make sure your tools are high-quality and matched to your portafilter size — that’s what separates a genuine upgrade from a gimmick.

The Normcore V4 is a spring-loaded tamper, which is its key feature. It is calibrated to provide consistent pressure every time you tamp. You simply press down until the tamper’s collar rests on the portafilter basket, and the internal spring ensures you’ve applied the correct force. This removes the guesswork, which is a game-changer for beginners.

Normcore calibrated espresso tamper 58mm with stand for home baristas

Benefits of the Normcore V4:

  • Perfectly Level Tamping: The self-leveling design ensures your coffee bed is flat and even, drastically reducing the risk of channeling.
  • Consistent Pressure: The spring mechanism delivers the same amount of force with every use, taking the guesswork out of how hard to press.
  • Affordable Excellence: This coffee tamper on Amazon delivers performance comparable to much more expensive tools. It provides a high return on investment for improving your espresso.

This tamper is ideal for beginners who are still developing their tamping technique and intermediate users who want to add more consistency to their routine. This spring-loaded espresso tamper review is simple: it works, it’s reliable, and it helps you make better coffee.

Other Essential Barista Tools For Homes

Beyond the tamper, a few other accessories can elevate your home coffee bar from functional to fantastic.

Coffee Distributor

An espresso distributor tool, sometimes called a WDT tool or leveler, is used before tamping. Its job is to break up clumps and evenly distribute the coffee grounds in the portafilter. By creating a uniform density, you ensure water flows through the entire puck at the same rate, leading to a balanced extraction. Without it, you might have dense spots and empty pockets, which cause channeling.

🏆 Top Pick: Normcore WDT Distribution Tool V2

Normcore WDT Distribution Tool V2 with 9 stainless steel needles and anodized aluminum handle for espresso puck preparation

The Normcore WDT Distribution Tool V2 is a professional-grade espresso accessory designed to perfect your puck preparation. Featuring 9 stainless steel needles (0.3mm diameter) mounted on a precision CNC-machined anodized aluminum handle, this tool effectively eliminates coffee grounds clumps and ensures uniform distribution before tamping

Key Selling Points:

  • 9 needles provide thorough grounds distribution
  • The magnetic stand keeps it accessible on your coffee bar
  • Matches your tamper’s black aluminum aesthetic
  • Significantly cheaper than premium alternatives while performing excellently

Thermometer

Temperature is a critical variable for both your espresso shot and your steamed milk. An espresso thermometer helps you hit the sweet spot. For milk, steaming between 140-155°F (60-68°C) creates a sweet, creamy microfoam without scalding the milk. For brewing, checking your water temperature ensures it’s in the ideal range (typically 195-205°F or 90-96°C) for proper extraction.

🏆 Top Pick: Decent Espresso Digital Thermometer

Decent Digital Milk Thermometer V2 Celsius version with LCD display showing 59°C actual temperature and 60°C set temperature, featuring preset buttons for 60°C, 65°C, and 70°C

Why it’s the best choice:

  • Specifically designed for coffee applications
  • Fast, accurate readings with an audible alarm when target temp is reached
  • Highly praised by home-barista community experts
  • Premium build quality trusted by serious enthusiasts
  • Available in two versions, depending on your preferred temperature unit: Celsius or Fahrenheit.
Celsius or Fahrenheit?
Choose Celsius if you’re serious about specialty coffee, compete, or follow global barista standards. Choose Fahrenheit if you’re a casual US home user prioritizing familiarity. Both offer identical 2-second accuracy and features—only the scale differs

Tamper Mat

A tamper mat for espresso is a simple but effective tool. This thick silicone or rubber mat provides a dedicated, non-slip surface for tamping. It serves two main purposes: it protects your countertop from scratches and dents from the heavy portafilter, and it stabilizes the portafilter, allowing you to apply firm, even pressure without it sliding around.

🏆 Top Pick: Rhino Coffee Gear Tamping Mat

Rhino Classic Portafilter Tamp Mat with espresso tamper and portafilter on wooden countertop, featuring non-slip silicone surface and Rhino Coffee Gear logo
The Rhino Classic Portafilter Tamp Mat provides a stable, non-slip surface for perfect espresso tamping while protecting your countertops from scratches and portafilter damage.

Why it’s the best choice:

  • Affordable & Simple.
  • Multiple Sizes Available.
  • Bottomless Portafilter Friendly.
  • Durable Silicone Construction.
  • Easy to Clean
Find your ideal tamper mat:
Need equipment protection? See our tamper mats guide. Struggling with level tamps? Try the same guide. Building a full coffee bar? Explore our home setup guide.

Knock Box

Once you’ve pulled your shot, you are left with a hot, wet puck of coffee grounds. An espresso knock box provides a clean and convenient way to dispose of it. It’s a small, sturdy container with a rubberized bar across the middle. You simply strike the portafilter against the bar, and the puck drops out cleanly. This keeps your trash can from getting messy and speeds up your workflow, especially if you’re making multiple drinks.

🏆 Top Pick: Dreamfarm Grindenstein

Dreamfarm Grindenstein knock box in black with horizontal rubber knock bar and compact cylindrical design for espresso puck disposal

Unlike cheap knock boxes that crack within months, the Grindenstein uses a thick-walled polymer that can take a beating. The horizontal rubber bar — the feature that started it all — flexes on impact then returns to shape, meaning you’ll never replace it. The vertical bin design keeps pucks stacked neatly instead of scattered, and the smooth interior rinses clean in seconds.

Thick Rubber Knock Bar – Absorbs impact silently; won’t crack or degrade like plastic alternatives

Deep, Narrow Bin – Holds 6-8 pucks compactly; less frequent emptying than shallow designs

Durable Polymer Construction – Proven 6+ year lifespan with daily use; dishwasher safe for easy cleaning

Compact Footprint – 4″ diameter fits on any drip tray or tight counter space

Weighted Base – Stays put during aggressive knocking; no sliding or hopping

How to Use These Tools Together

Here is a step-by-step workflow incorporating these essential tools:

  1. Grind Your Beans: Start by grinding your coffee fresh into the portafilter.
  2. Distribute: Use your coffee distributor tool to break up any clumps and create a level surface.
  3. Tamp: Place your portafilter on the tamper mat. Use the Normcore V4 tamper to press down firmly until the spring fully compresses and the collar touches the basket.
  4. Pull Your Shot: Lock the portafilter into your machine and start the brewing process.
  5. Steam Milk (if needed): Use your thermometer to monitor the milk temperature as you steam it for a latte or cappuccino.
  6. Clean Up: After brewing, knock the used puck into your knock box for quick and easy disposal.

Buying Guide & Tips

When shopping for barista tools, keep these factors in mind:

  • Size: This is the most important consideration. Your tamper and distributor must match the diameter of your portafilter basket (e.g., 53.3mm, 58mm). Check your espresso machine’s manual for the correct size.
  • Material: Look for tools made from durable materials like stainless steel and food-grade silicone. They are easy to clean and built to last.
  • Ease of Cleaning: Accessories that come into contact with coffee grounds need regular cleaning. Choose items that are easy to rinse or disassemble.

FAQ

1. Do I really need a tamper mat?
While not strictly necessary, a tamper mat is highly recommended. It protects your counters from damage and provides the stability needed for a good, level tamp. For a small cost, it adds a lot of convenience and safety to your routine.

2. What size tamper fits my machine?
This depends entirely on your espresso machine’s brand and model. Common sizes are 51mm, 53mm, and 58mm. Always check your machine’s specifications before buying a tamper or distributor.

3. How often should I clean my knock box?
You should empty your knock box daily to prevent mold and odors. A quick rinse with water is usually sufficient, with a more thorough soap-and-water cleaning once a week.

Conclusion

Building a home espresso setup is a rewarding journey. While the machine is the star, accessories like the Normcore V4 tamper, a distributor, and a knock box are the supporting cast that ensure a flawless performance every time. These tools replace guesswork with precision, helping you pull consistently delicious shots you can be proud of. The Normcore tamper, in particular, is a fantastic starting point that delivers an immediate, noticeable improvement to your coffee.

Ready to take control of your espresso? Check the current prices for these essential home barista tools on Amazon and start your journey toward the perfect shot.

Pairing these tools with a solid espresso machine and a reliable digital scale rounds out a complete home barista setup.

Top-Rated Manual Coffee Grinders for Under $100 You’ll Love

Manual coffee grinder filled with freshly ground coffee beans on a table, with whole coffee beans and espresso coffee in the background.

For true coffee enthusiasts, the allure of manual brewing techniques is undeniable. While electric grinders offer convenience, manual coffee grinders provide a unique combination of affordability, precision, and hands-on engagement. This combination elevates the overall coffee-making experience.

This guide will explore everything you need to know about manual coffee grinders, how they compare to electric options, and what to look for when shopping on a budget. Plus, we’ll review five of the best manual coffee grinders that balance performance, price, and quality.

Why Choose a Manual Coffee Grinder?

Are Manual Coffee Grinders Better Than Electric?

Yes, manual grinders often outperform electric counterparts in the same price bracket. Here’s why:

  • Higher-Quality Burrs for the Price: Electric grinders allocate a significant chunk of costs to motors and electronics, while manual models focus on burr quality. This translates to better grind consistency, which is crucial for flavor extraction.
  • Cost-Effectiveness: A high-quality manual grinder under $100 can rival electric grinders priced at $200 or more. This makes them an excellent choice for coffee lovers looking to maximize value.

Do Manual Coffee Grinders Work for Espresso?

Certainly, this depends on the grinder model and your brewing method. Many high-precision manual grinders—often priced under $100—are capable of producing a fine, consistent grind suitable for espresso. This makes them a viable option if you’re pairing them with an entry-level espresso setup, such as the machines we cover in our guide to espresso machines under $300.

That said, grinding for espresso requires more time, effort, and patience compared to coarser grind sizes. If you primarily brew less demanding methods like French press coffee, manual grinders are far more forgiving and enjoyable to use. In fact, they pair exceptionally well with the brewers featured in our French press coffee makers guide, where grind consistency matters more than extreme fineness.

For occasional espresso brewing, a good manual grinder in this price range is usually sufficient. However, if you’re pulling multiple espresso shots every day, you may want to upgrade to a premium manual grinder or consider a dedicated electric grinder to save time and effort. These same grinders shine even more with methods like pour-over brewing, where a coarser, more forgiving grind is all you need.

Why Are Some Manual Grinders More Expensive?

Even within the manual grinder category, some models cost more due to their materials and engineering:

  • Durable Burrs: High-end grinders use hardened steel or ceramic burrs that maintain sharpness over time.
  • Sturdy Construction: Premium models often incorporate stainless steel or aluminum, ensuring longevity.
  • Precision Engineering: Better grinders feature tight tolerances and advanced bearing systems, resulting in smoother operation and more consistent grinds.

Benefits of Hand-Grinding Coffee

Grinding coffee just before brewing is a game-changer. Here’s why:

  • Fresher Flavor: Pre-ground coffee loses its aroma and flavor within minutes due to oxidation. By grinding your own beans, you lock in that rich, aromatic freshness.
  • Customizable Grind Size: Manual grinders allow you to adjust the grind size for various brewing methods, from espresso to French press.
  • Mindful Coffee Ritual: Hand-grinding your coffee adds a tactile, meditative element to your morning routine. There’s something special about the deliberate act of preparing your coffee.

How to Use and Maintain a Manual Coffee Grinder

Using a manual coffee grinder is simple, but getting the best out of yours requires consistent care.

Steps to Grind Coffee Manually

  1. Adjust the Settings: Most manual grinders allow you to fine-tune the grind size via a knob or screw.
  2. Add Coffee Beans: Fill the hopper, taking care not to overfill.
  3. Secure the Hand Crank: Make sure it’s properly attached to avoid slippage.
  4. Grind the Coffee: Use smooth, consistent rotations for an even grind.
  5. Check the Results: Periodically check the grounds for uniformity, especially when adjusting settings.

Maintenance Tips

  • Regular Cleaning: Brush out leftover coffee particles weekly to prevent stale flavors.
  • Deep Cleaning: Once a month, disassemble the grinder for a thorough cleaning, especially around the burrs.
  • Inspect Burrs: Ensure burrs are sharp and free from defects.
  • Store Properly: Keep your grinder in a dry place to prevent rust on metal parts.
Infographic showing the parts of a manual coffee grinder, including handle, burrs, hopper, adjustment ring, and catch cup, with tips for using a coffee grinder.
An illustrated guide to manual coffee grinder parts and essential tips for better coffee grinding.

Factors to Consider When Buying a Manual Coffee Grinder

Not all manual grinders are created equal. To find the best manual coffee grinder under $100 for your needs, take these key factors into account:

Burr Material

  • Ceramic Burrs: Long-lasting and resistant to heat, but can chip if dropped.
  • Steel Burrs: Durable and precise, delivering consistent grinds but may warm up with extended use.

Grind Consistency

Uniform grind size is essential for flavor extraction — see our grind size reference chart to dial in the right setting for your brew method. Look for grinders with stable burrs, smooth adjustment mechanisms, and quality dual-bearing systems for optimal consistency.

Capacity

Select a grinder that matches your usual brewing quantity:

  • 20-25g: Ideal for single servings or travel use.
  • 30-40g: Suited for preparing multiple cups in one go—perfect for households or entertaining guests.

Build Quality

Prioritize grinders with robust stainless steel or aluminum construction for long-term durability, and be cautious with units that contain too many plastic components, which might wear out prematurely.

Even within the manual grinder category, some models cost more due to their materials and engineering.

Portability

Frequent travelers or campers will appreciate compact, lightweight grinders that fit easily into backpacks or suitcases. For home use, a heavier, larger grinder can offer more stability during operation.

Before purchasing your grinder, check the design of the catch-up cup (the container that collects your ground coffee). A practical catch-up cup should be wide enough for you to comfortably fit a spoon inside, making it easy to scoop out coffee grounds without spilling. For those who routinely brew two or more cups at a time, choose a manual grinder with a catch cup that offers extra capacity. This not only speeds up your morning routine but also minimizes the need for multiple grinding sessions. A larger cup also helps prevent overflow and mess, making your coffee experience more enjoyable from start to finish.

JavaPresse Manual Coffee Grinder

JavaPresse Manual Coffee Grinder

Overall Rating

★★★★★
Check Price on Amazon

The JavaPresse Manual Coffee Grinder has quickly become a staple in my coffee routine. Compact and crafted from stainless steel, it’s easy to toss in a backpack or keep on the kitchen counter. With 18 adjustable grind settings, I can switch from French press coarse to espresso-fine with little hassle—though grinding for espresso does take a bit of effort and patience.

Setup is straightforward, and everything feels solid enough for daily use, despite some minor quirks like a slightly loose adjustment knob and the occasional cosmetic scratch on the plastic window. Where this grinder shines is its grind consistency. The ceramic burrs make a big difference, producing uniform, static-free grounds—far superior to my old blade grinder, which often left me with a mess and uneven grinds. I love how quietly the JavaPresse operates; it offers a soothing, quiet crunch instead of the noisy whir of electric grinders.

The improvement in coffee quality is immediately noticeable. My coffee is fresher, more flavorful, and lacks the bitterness that results from overheated or uneven grinding. I also appreciate the travel-friendly design—no cords, no batteries, just fresh ground coffee wherever I go.

Timemore Chestnut C2 Manual Coffee Grinder

Overall Rating

★★★★★
Check Price on Amazon

If you want premium performance without paying designer prices, the Timemore Chestnut C2 is the sweet spot for budget-conscious coffee lovers. This hand grinder gives you impressively consistent results. The five-axis CNC machining ensures the burrs slice through beans quickly and evenly, and the dual-bearing system keeps every grind smooth and stable.

Adjusting the grind is straightforward—simply turn the internal knob to set your preferred coarseness, with clear feedback for everything from fine espresso to coarse French press. Whether you brew at home, in the office, or on camping adventures, the C2 is compact (25g capacity) and weighs only 430g, making it ideal for portability.

Cleaning the grinder is simple—its tool-free design means you can easily brush out grounds and keep maintenance stress-free; just avoid rinsing with water. And despite the lightweight frame and affordable price tag, the C2 exudes solid build quality and longevity.

In use, it’s remarkably quick and efficient, grinding enough beans for a full Chemex in about half the time it takes to heat water. The Chestnut C2 consistently produces even grounds, noticeably improving cup quality over cheap, uneven blade grinders, and banishing the “coffee dust” that plagues lesser models. For those upgrading from entry-level products, this grinder delivers a dramatic step up, making every brew taste richer and brighter.

Hario Ceramic Coffee Mill-Original, Black

Hario Ceramic Coffee Mill

Overall Rating

★★★★★
Check Price on Amazon

The Hario Ceramic Coffee Mill combines style, durability, and functionality into a compact, portable design—perfect for coffee enthusiasts on the move. Its sleek and modern aesthetic, crafted from long-lasting materials, makes it a must-have for anyone who insists on fresh ground coffee wherever they are. Whether you’re at home, camping, or traveling, this grinder delivers precision and consistency in every grind.

Coffee lovers rave about the Hario Coffee Mill’s ability to elevate home brewing. Many appreciate how its smooth grinding mechanism and precise results rival more expensive models. For those experimenting with varied grind sizes, the mill’s customizable settings are invaluable. Plus, its compact build ensures it’s your ideal companion for brewing excellence, whether perched on your kitchen counter or packed into your travel gear.

The Hario Ceramic Coffee Mill delivers unbeatable value for those who prioritize quality without overspending. Start your day with a freshly ground cup and elevate your coffee experience to new heights!

IMAVO Manual Coffee Grinder

Overall Rating

★★★★★
Check Price on Amazon

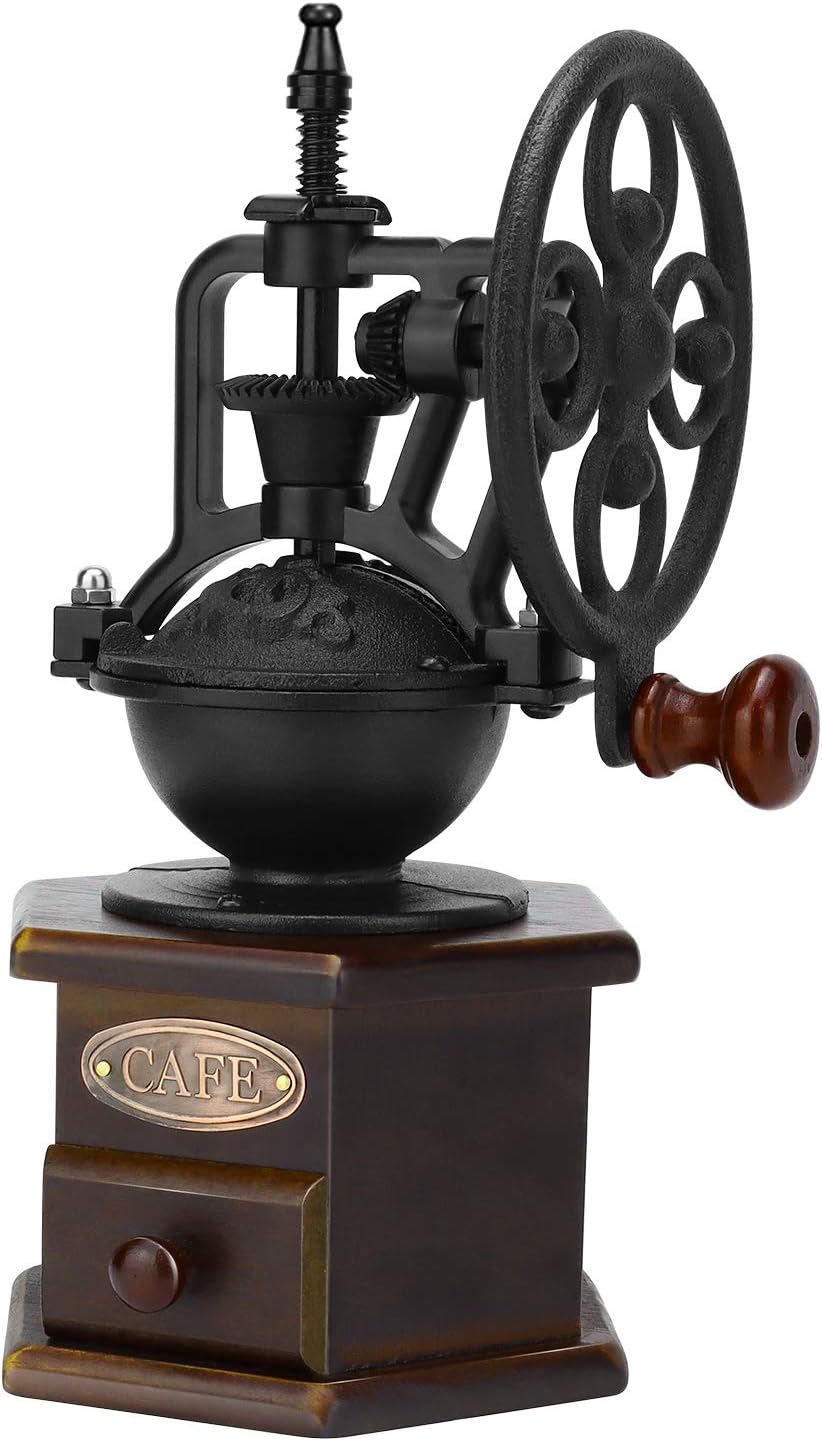
The IMAVO Manual Coffee Grinder stands out with its eye-catching antique design, crafted from solid wood and cast iron, which underscores its vintage appeal. Unlike many modern grinders, this model doubles as home décor, adding a touch of warmth and character to any kitchen. It uses high-quality ceramic burrs, ensuring consistent and precise grinding, which translates to fresher and more flavorful coffee.
This grinder is well-suited for those who enjoy the ritual of manual grinding and seek an affordable yet stylish solution. Its sturdy build and compact size make it desirable for smaller households or as a thoughtful gift for coffee lovers who appreciate unique and handcrafted designs. While it may not cater to high-capacity needs or ultra-fine espresso grinds, its charming look and dependable functionality make it a worthy choice in the niche of antique-style wooden coffee grinders.

The IMAVO Manual Coffee Grinder is a perfect blend of functionality and aesthetic charm, making it an attractive choice for coffee enthusiasts who value vintage style and an affordable price point. It’s a great option for those looking for wooden coffee grinders that double as decorative kitchen pieces, all while delivering freshly-ground coffee.

Final Thought

Investing in a manual coffee grinder under $100 is one of the best ways to enhance your brewing experience without overspending.

Whether you’re grinding espresso, French press, or anything in between, any of the options reviewed here will take your coffee game to new heights. Make sure to consider the benefits of manual coffee grinders for the best brewing results.